QASM Simulator is a simulator provided by Qiskit that runs the Quantum Circuit and measures it results. It is useful when the Quantum Circuit contains measurement instructions for Qubits into bits. In this chapter of the Qiskit tutorial, you will learn about QASM Simulator and how you can use the QASM Simulator from the BasicAer module of qiskit.
QASM Simulator runs the Quantum Circuit a given number of times and measures the result of Qubits onto classical bits at the end of each iteration of the run. QASM Simulator runs the Quantum Circuit as it would on a perfect Quantum Computer.
Selecting the QASM Simulator
The QASM Simulator from BasicAer module can be selected using the get_backend() function.
from qiskit import BasicAer
backend = BasicAer.get_backend('qasm_simulator')
Creating a Quantum Circuit
QASM simulator is useful only when the Quantum Circuit contains measurement instruction. Therefore, the Quantum Circuit that needs to be simulated through QASM Simulator needs to have measurement instructions.
from qiskit import QuantumCircuit

qc = QuantumCircuit(2, 2)
qc.h(0)
qc.h(1)
qc.measure([0, 1], [0, 1])
The Quantum Circuit specified above puts both the Qubits in the state of superposition. The state ψ of the Quantum Circuit can be written as-
ψ = 1/sqrt(4) [ |00> + |01> + |10> + |11> ]
Note– sqrt(4) denotes square-root of 4, i.e, 2.
Simulating Quantum Circuit through QASM Simulator
We will stimulate the Quantum Circuit we just created.
Creating a Job
First we execute the Quantum Circuit we created on the QASM Simulator backend. This creates a job to execute the Quantum Circuit which is stored as an object in the variable job.
from qiskit.execute_function import execute

job = execute(qc, backend)
Note– By default, the QASM simulator runs the simulation of a total of 1024 times. This can be changed to any number by passing it as the shots parameter to execute() function along with Quantum Circuit and backend.
Getting Results
job object contains information related to the job that was executed on the QASM Simulator. The result of the simulation can be obtained by calling the result() method on job. The result is stored as an object in the variable result.
result = job.result()The outcome of measurement of Qubits can be obtained from the result variable by calling the get_counts() methods on result.
counts = result.get_counts()

# Print the outcome of measurement
print(counts)
The output of this will be-
{'01': 276, '11': 233, '10': 242, '00': 273}
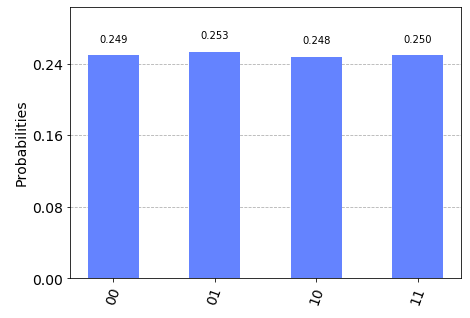
Notice that the result from the QASM Simulator are as expected. The probabilities of getting |00>, |01>, |10>, and|11> upon measuring the Qubits are all supposed to equal. This is reflected in the results where the counts of |00>, |01>, |10>, and|11> are almost equal.
Plotting the Results
The results from the QASM Simulator are best plotted by using a histogram. You will learn about Qiskit Visualization Tools in later chapters. Learn More about plotting histogram using Qiskit
